Monday, August 20, 2012

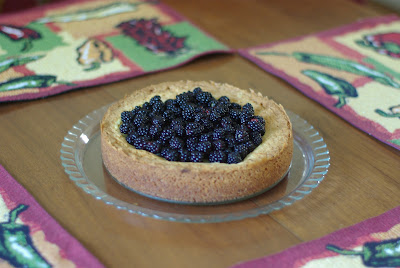
Blackberry Custard Torte


I've recently returned from my annual summer vacation in Maine. I love Maine. And I love that the blackberries are always ripe when I visit in August. This year, my mom had a brand new kitchen for me to bake in (she had a kitchen remodel done just a month after my visit LAST August) and a family friend invited me over to his house to pick wild blackberries. My five year old and I headed over and I picked enough (I say I, because he decided after picking about 3 berries that he was done and then found a spot in the shade) to fill a large berry basket.

Mom's request was this particular recipe, a blackberry torte which she told me she had made once, years ago. After a bit of hunting, we found the particular recipe she was after and my helper and I went to work.

First of all, I love cooking in Mom's kitchen, because she has all kinds of cool vintage kitchenware. Secondly, after years of baking in her very dark kitchen (it is a U-shaped kitchen with a single window) with walnut colored cabinets, it was like a dream to bake in her newly done space. Not just the color was changed, but the whole configuration of cabinets, making a much more efficient workspace. I had been looking forward to it all year! (Yes, strange things excite me)

So, let's get down to the recipe...

It is from the June/July 2000 issue of Taste of Home, and can be found online here.

Ingredients:
Dough will be very pasty and sticky
Crust:
1 cup all purpose flour
1/2 cup sugar
1 1/2 tsp baking powder
1/2 cup cold butter (1 stick)
1 egg

Custard Filling:
3 egg yolks
16 oz sour cream
1/2 sugar
1/4 tsp vanilla extract
4 cups fresh or frozen blackberries, divided
whipped cream


Combine flour, sugar and baking soda. Cut in the butter with a pastry blender until crumbly. Add in the egg, stirring with a fork, until the dough forms a ball. It will be very sticky.  In an ungreased springform pan, press the dough on the bottom and up the sides, being careful not to leave any gaps. I found using a silicone spatula, slightly greased to keep the dough from sticking to it, worked really well.


In another bowl, combine the egg yolks, sour cream, sugar and vanilla, mixing until just combined. Spread half of the blackberries over the crust dough, then pour the filling over the top, spreading until smooth. Bake at 325F for 90 minutes. Center will be almost set and will fall after cooling. Once cool, add the remaining blackberries to the center of the torte.

To serve, remove the outside of the springform pan. Slice and add a dollop of whipped cream. Serves 14-16. Enjoy!


Friday, July 27, 2012

Apple-Cheddar Quiche


I've always resisted the apple-cheese combination. I know a lot of people like it. I've seen slices of apple pie with a big slice of melted cheese on top. But it always turned me off. The thought of pairing cheese with apples just didn't do it for me. 

Then one day a few weeks ago, I was making lunch for my son and was cutting up slices of apple and cheese. For no good reason, I took a piece of each and ate them together. And it was good!

So when I was looking for something for brunch last week, I stumbled on this unusual quiche and decided to give it a try. I'm glad I did, because I think it was fantastic. It was a little change from the typical quiche and the apples and cheddar balanced each other nicely. I highly recommend it if you are looking for something a little different.

Ingredients:
1 unbaked pie crust (I used a frozen pre-made crust that was in my freezer)
2-3 tart, firm apples (such as granny smith) peeled, cored and sliced
1 cup shredded cheddar cheese
2 eggs, beaten
1 cup evaporated milk
1/2 tsp salt
dash each of cinnamon and nutmeg

Preheat oven to 350. Fit the pie crust into a 9 inch quiche pan or pie plate. Arrange the apple slices in the pie shell. My quiche pan fit 2 good sized granny smith apples. Sprinkle the cheese evenly over the apples. In a small bowl, combine the eggs, milk and spices. Pour the mixture evenly over the apples and cheese. Bake for 60-70 minutes. Serve warm or chilled.

Recipe adapted from Yankee Magazine

I made this the night before brunch and served it at room temperature the next day. It was great that way. I also warmed up a piece for dinner later that night and it was great warm as well. Enjoy!

Tuesday, July 24, 2012

Baked Donut Holes


Baked donuts. Easier and far healthier than fried donuts. And who can resist a cute donut hole?  

Not kids, that's for sure. Because I made this batch of 24 donut holes and by the end of my brunch last week there were 4 left. Those 6 toddlers and preschoolers went to town on the donut holes. But that's okay. I can easily make more because these were SO quick and easy to make. You can find the original recipe here, although I altered it a bit.

Ingredients:
1/2 cup sugar
1/4 cup melted butter or margarine
1/2 cup milk
1 tsp baking powder
1 cup flour

Preheat over to 375 and grease a mini muffin pan (mine has 24 spaces, so I only needed to do this once.) Mix sugar and melted butter or margarine in a medium bowl. Stir in the milk, and then the baking powder and flour until ingredients are just combined.  Fill muffin cups halfway. Bake 15-20 minutes. Tops should be a light golden color.

Meanwhile, melt another 1/4 cup of butter or margarine in a large dish and add about 3/4 cup of powdered sugar to a large Ziploc bag. Once the donuts come out of the oven, cool slightly. Then roll in the melted butter and place in the sugar. Shake well to coat and then set aside to cool.

I might make these again next time I have to bring something to a playdate. They were quick, easy and yummy. Tasted just like a donut hole! Enjoy!


Sunday, July 22, 2012

Spinach Tomato Quiche


More from brunch!

I have a lovely little raised backyard garden going this summer. I made it using cinderblocks and I have tomatoes and some flowers growing in the garden and then flowers and herbs in the holes of the cinderblocks. My tomato plants have just been on fire this summer and I can't keep up with all of these amazing tomatoes. I am also in the process of trying to clear out my freezer and pantry items. I like to do that about once a year, just to use things up. So when planning brunch, I was also trying to make as much use of what I had on hand.  A quick look through the freezer netted me some ready made pie crusts and a thing of frozen spinach, and I found several cans of evaporated milk in the pantry. A little Google search brought me here, the inspiration for this quiche.  It was incredibly simple to put together and just took a little forethought to take the pie crust and spinach out of the freezer the night before. And it tasted great!

Ingredients:
1 ready made pie crust
1 10 oz package frozen chopped spinach (thawed and squeezed dry)
1/4 cup fat free sour cream
1 cup evaporated milk
2 large eggs
2 medium tomatoes, sliced thinly
1/3 cup shredded monterey jack cheese
salt and pepper

Preheat over to 350. Spray pie plate or quiche pan with cooking spray. Roll out pie crust into pan.

Mix spinach and sour cream in a small bowl. Make sure that as much moisture as possible has been removed from spinach, or your quiche will be soggy. In a separate bowl, combine milk, eggs and salt and pepper. Stir 1/3 cup on the milk and eggs into the spinach mixture.  Spread the spinach on the bottom of the crust and top with the tomato slices. Spread the cheese on top of the tomatoes. Pour the remaining milk and egg mixture into the pie plate.

Bake for 45-55 minutes.

Enjoy!

Friday, July 20, 2012

Brunch Fare


I love brunch. I love brunch foods like muffins and scones and quiches. I love the mix of sweet and savory dishes.

I had some great ladies over for brunch this morning. Despite the flies that invited themselves to the party, we had a great time.


My brunch menu consisted of two quiches (spinach/tomato and apple/cheddar), blackberry scones, mini muffin cinnamon donuts, salad with blackberry vinaigrette dressing, fruit, coffee and friendship tea. I'll share them all eventually, but today I'll share the recipe for the friendship tea.


I'm not sure where this recipe came from. It was on a card in my recipe box. I found it while poking through, looking for something else. It sounded good, and I had everything I needed, so I thought I'd make up a batch.  I'm glad I did! It was great. I kept it hot, but it would have been great iced, especially for summer. It would be great in the winter for a nice holiday drink, too.

Friendship Tea:
2 1/2 cups cranberry juice
1 1/2 cups water
1 cup orange juice
1/4 cup sugar
1 cinnamon stick
4 whole cloves
6 black tea bags

Combine all ingredients except tea bags in a medium sized saucepan and brink to a boil.  Remove from heat and add the tea bags. Steep for 5 minutes. Remove the tea bags and spices. Pour into a carafe or serve straight from the stove.

This tea made my kitchen smell SO good and it tasted amazing. I will definitely be making this again. And probably soon, because I still have all the ingredients to make another batch. Enjoy!

Friday, July 13, 2012

Best Ever Carrot Cake with Cream Cheese Frosting

I love carrot cake.

It is so flipping good. And healthy. I mean, there's all those carrots in it, right?

I made my own birthday cake again this year. Not because I had to, but because I wanted carrot cake and I wanted to make it. I found my inspiration here.

This cake has an obscene amount of carrots in it. It came out great and didn't last long. Here you go:

Cake:
2 1/4 cups flour
1 1/2 tsp baking powder
1 tsp baking soda
1 tsp cinnamon
1/4 tsp ginger
1/2 tsp salt
1/4 tsp nutmeg
4 eggs, room temperature
1 1/2 cups sugar
1 cup safflower oil
1/2 cup buttermilk
2/3 cup packed brown sugar
2 tsp vanilla
1/2 cups drained crushed pineapple
1 pound grated carrots
1 cup chopped pecans

Preheat oven to 350 and prepare three 8" or 9" cake pans with crisco and line with parchment paper.

Grate the carrots. Use your food processor, if you have one. Otherwise, you'll be grating carrots for a very long time. I used my food processor. It took about 5 minutes.

Combine all of the dry ingredients in a medium bowl and set aside. In a large bowl (I prefer my Kitchenaid stand mixer), combine the eggs, oil, both sugars, vanilla, buttermilk and pineapple. Mix in the dry ingredients. I usually mix in about 1/4-1/3 of dry ingredients at a time, so as not to have a cloud of flour erupt in my face from the mixer.

Once ingredients are well mixed, stir in the carrots. Pour the batter into the pans and bake for 35-40 minutes. Cool in pans for 30 minutes, then remove and continue cooling on racks.

Cream Cheese Frosting:
16 oz softened cream cheese (I use Neufchatel cheese)
1/2 cups softened unsalted butter
2 tsp vanilla extract
3 cups powdered sugar (you can add more if you need/want it)

Combine cream cheese and butter and beat until creamy. Beat in vanilla. Add in powdered sugar, 1 cup at a time. If the frosting is not thick enough for you, add more sugar until it is.

Assemble the cake by spreading about 1 cup of frosting between the layers and the remaining frosting on the top and sides. Sprinkle the pecans on top of the cake.


All that was left by the end of the day

This cake was moist and flavorful. I really enjoyed the addition of the pineapple. It added a bit of sweetness to the cake. I don't make carrot cake often (as much as I love it, I love so many other cakes that I am always trying new things) but next time I get a craving for carrot cake, I think this is the one I will make.

Enjoy!


Sunday, July 8, 2012

Dirt Cake

I found this unfinished post from nearly a year ago that I apparently started and never finished. Oops! Oh, well, it doesn't lessen the awesomeness of this dessert, one of my all time favorites!

Dirt Cake


I'm in the middle of my summer vacation here at my mom's house in Maine and having a fabulous time.  I love it here.  The weather has been (mostly) beautiful and we've had an enjoyable time relaxing by the pool and just enjoying what Maine has to offer (which is lots, by the way.)

But, being away from my own home isn't going to keep me out of the kitchen!  But turning on the oven on a hot day? No, thank you.  So, when we had a beautiful day earlier this week and had company in the form of one of my favorite people in the world, I wanted a cool and easy dessert.  Dirt cake totally fit the bill.  Normal dirt cake is made with classic Oreos and vanilla pudding, but I like to shake things up a bit. Sometimes, I use lemon cookies and pudding and call it sand cake!

Ingredients:
1 lb Orea cookies (I'm cheap and used generic Oreos, chocolate ones and yellow ones)
8 oz cream cheese (I prefer the lower fat neufchâtel)
1/2 cup softened margarine
1 cup powdered sugar
12 oz Cool Whip
2 small boxes instant vanilla pudding
3 cups milk
1 tsp vanilla

In a large bowl, mix the sugar, margarine and cream cheese until well blended and smooth (make sure there are no lumps!) Fold in the Cool Whip.

Either in a food processor or in a large ziploc bag with a rolling, crush the cookies (but not too fine, a little bit chunky is okay). 

For one large dessert, layer half the cookies at the bottom on a 13x9 pan, spread all of the filling on top and then top with the remaining cookies. Chill for at least a few hours.

For individual desserts, layer in small bowls. Clear dessert bowls work best :) Enjoy!


Friday, July 6, 2012

White Chocolate Berry Trifle


Occasionally, I get so inspired, I come up with my own creations. I am particularly proud of this one that I created as a no bake, portable, Independence Day dessert.

It's light and easy and goes together quickly (took me about 30 minutes).

Ingredients:
8 oz marscapone cheese
1 cup powdered sugar
2 1/2 cups Cool Whip (divided)
48 ladyfingers
1 lb strawberries
2 Tbsp powdered sugar
2 cups blueberries
1 cup white chocolate morsels


To make the filing, in a medium sized bowl, beat the cheese and powdered sugar until smooth and creamy. Add 2 cups of Cool Whip and beat until well blended. Set aside.

For the white chocolate ganache, in a microwave safe bowl, combine the chocolate and remaining 1/2 cup Cool Whip. Microwave for 40-60 seconds, stopping in 20 second intervals to stir.

To prepare the strawberries, wash and hull them, then cut into bite sized pieces. Add 2 Tbsp powdered sugar and mix until dissolved. This process is called macerating and brings out the juices in the berries. Those juices will soak into the ladyfingers.

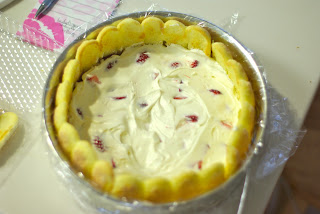
Meanwhile, prepare a springform pan by lining the sided with plastic wrap and then snapping the bottom into place. Arrange ladyfingers around the sides and bottom, reserving enough for one more layer. Spread half of the prepared strawberries on the bottom, followed by half of the filling and the remaining ladyfingers. On top of the ladyfingers, spread the remaining strawberries and then drizzle the ganache over the berries. Spread the rest of the filling over the strawberries and then spread the cleaned and dried blueberries over the top in a single layer. For the final touch, drizzle more ganache over the blueberries. Chill for at least 3 hours to allow the filling to set and the juice from the berries to soak into the ladyfingers.


To serve, open the spring for pan and remove the plastic wrap. The ladyfingers become very moist and cake-like with the juices from the berries. And I think it looks pretty impressive with the ladyfingers all around it! Enjoy!


This post is linked to:
Sweets for a Saturday


Tuesday, January 31, 2012

Ukrainian Pirog with Cheese Filling


So, I've mentioned that I used to live in Ukraine. Well, when I lived there, one of my ABSOLUTE favorite things to eat is what they call pie (pirog/пирог). It's so good. And we had a little pirogovaya right around the corner. Very dangerous when you don't feel like cooking!

Since being back in the States, the Ukrainian pie is one thing I have missed SO much. I've wanted to attempt making one, but the dough is very specific and I couldn't find the right recipe. Well, for New Year's Eve, which we always celebrate with a Ukrainian flair, I decided that come Hell or high water, I was going to make one!

So I set to googling. And googling. And then I googled some more. And just when I thought I'd never find what I was looking for, there it was. It had a horrid looking filling in it, but I'd worry about that later. I'd FOUND the dough!

The dough in question is yeast based, light and flaky, and slightly sweet. But not too sweet, because sometimes it has savory fillings. I decided to make mine with a  traditional cheese filling.

I started with the dough, the recipe for which I found, here:

Dough:
2 tsp yeast
3 Tbsp cold water
pinch of sugar
3 3/4 cups flour
2 Tbsp sugar
1 tsp salt
scant 1/4 tsp baking powder
1 1/2 sticks unsalted butter, cut into cubes
1/4 cup plus 2 Tbsp cold milk
2 eggs
3 Tbsp sour cream
2 tsp lemon juice

Dissolve the pinch of sugar in 3 tbsp water in a small glass bowl Add the yeast and cover with plastic wrap. Let stand until foamy, about 10-15 minutes.

While the yeast gets foamy, combine the dry ingredients in a bowl of a stand mixer. With the paddle attachment on low, mix in the cold butter until the mixture resembles coarse crumbs (of course, you can always use a regular mixer for this, but a stand mixer frees up your hands).
Whisk together the cold milk, eggs, sour cream, and lemon juice. Then whisk in the yeast. Add this mixture slowly and continuously to the flour-butter mixture with the mixer on low. Mix until well combined, about 2 minutes. Put a dough hook attachment on the mixer and knead the dough for 5 minutes (or you can knead by hand). Turn the dough onto a lightly floured working surface and fold it over several times to form a soft dough. Cover the dough with plastic and refrigerate for 15 minutes.
After the dough has been refrigerated, now comes the fun part! Forming it and making the filling!
For my pirog, I chose a round one with a lattice top. There are so many variations, though! You can do round, oval, square, rectangle. And for the top, you can do the lattice, or a braided look. Or you could cover the whole thing with a sheet of dough and do some decorative shaped either in dough on top, or cut out of it. I divided the dough in half and rolled on half into a circle the size of my stoneware pan (about 12 inches) with the edges overlapping a bit.
 Here's me working on the lattice, after I've put in the filling:


For my filling in this one, I chose what is called tvorog/творог. If you have a Russian grocery near you, you can find it there. Alternately, you could use farmer's cheese. Or even cream cheese. I added just a little sugar to my tvorog (It comes in a small container, about the size of half of a standard brick, and that is the perfect amount for the filling here) and then some raisins. I mixed it well and spread it in an even layer on the dough circle, leaving room around the sides to fold the dough up.

Once the filling is in, roll out the remaining dough and cut into strips (I use a pizza wheel for this) and then weave a lattice on the top. I like the lattice because it bakes up nice and golden and lets you see the filling.

Now for the egg wash. Whisk together 1 egg and 1 tsp water and spread it over the top of the pie. This will help it bake golden and flaky:


Once you've done the egg wash, place the pie in a 350 degree oven and bake for 30-35 minutes. When it is done, the dough should be golden and flaky looking:


These pies are best served warm, but they can easily be reheated. I don't have any pictures of a slice of the pie because it was gone too fast! 

Now that I have the dough recipe, I look forward to trying other fillings. I'd like to do one of my favorites from Ukraine, a spinach filling. I just have to remember what else was in it. Other favorite filling of mine are: lemon curd, apple, pomegranate, cranberry. I'm a sucker for the sweet fillings. Savory favorites include: spinach, egg, potato (mashed), and my husband loves ground meat.

Please let me know if you try making one and what kind of fillings you try!