Showing posts with label strawberry. Show all posts

Friday, July 6, 2012

White Chocolate Berry Trifle


Occasionally, I get so inspired, I come up with my own creations. I am particularly proud of this one that I created as a no bake, portable, Independence Day dessert.

It's light and easy and goes together quickly (took me about 30 minutes).

Ingredients:
8 oz marscapone cheese
1 cup powdered sugar
2 1/2 cups Cool Whip (divided)
48 ladyfingers
1 lb strawberries
2 Tbsp powdered sugar
2 cups blueberries
1 cup white chocolate morsels


To make the filing, in a medium sized bowl, beat the cheese and powdered sugar until smooth and creamy. Add 2 cups of Cool Whip and beat until well blended. Set aside.

For the white chocolate ganache, in a microwave safe bowl, combine the chocolate and remaining 1/2 cup Cool Whip. Microwave for 40-60 seconds, stopping in 20 second intervals to stir.

To prepare the strawberries, wash and hull them, then cut into bite sized pieces. Add 2 Tbsp powdered sugar and mix until dissolved. This process is called macerating and brings out the juices in the berries. Those juices will soak into the ladyfingers.

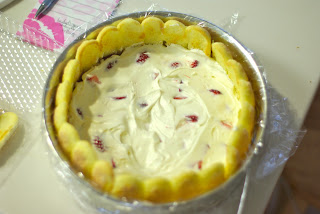
Meanwhile, prepare a springform pan by lining the sided with plastic wrap and then snapping the bottom into place. Arrange ladyfingers around the sides and bottom, reserving enough for one more layer. Spread half of the prepared strawberries on the bottom, followed by half of the filling and the remaining ladyfingers. On top of the ladyfingers, spread the remaining strawberries and then drizzle the ganache over the berries. Spread the rest of the filling over the strawberries and then spread the cleaned and dried blueberries over the top in a single layer. For the final touch, drizzle more ganache over the blueberries. Chill for at least 3 hours to allow the filling to set and the juice from the berries to soak into the ladyfingers.


To serve, open the spring for pan and remove the plastic wrap. The ladyfingers become very moist and cake-like with the juices from the berries. And I think it looks pretty impressive with the ladyfingers all around it! Enjoy!


This post is linked to:
Sweets for a Saturday


Sunday, July 3, 2011

Independence Day Cake

Happy Fourth of July!


This is one of my favorite holidays.  I'm wildly patriotic and love to celebrate.  I love the cookouts, the fireworks, spending time with friends and family.  And I greatly enjoy coming up with creative desserts to share with a red, white and blue theme!

Someone recently pointed me in the direction of a blue velvet cake.  The blue hue was striking and I thought, "that would be awesome for a July 4th cake!"  And so this is what I came up with.  The blue didn't come out exactly as bright as I had hoped, but it is still a pretty blue.  I didn't have the royal blue food coloring, so I used Cars Blue, left over from someone's birthday cake last year.  But like I said, it was still pretty blue, and the taste was great.  Like red velvet, only blue.  I paired it with a classic white cake, white buttercream frosting and strawberries.


I found the original recipe for the blue velvet cake here.

Blue Velvet Cake
2 cups sugar (I used 1 cup Splenda for baking)
1 cups (2 sticks) unsalted butter, softened
2 eggs
1 1/2 Tbsp unsweetened cocoa powder
1 Tbsp royal blue food coloring
1 small dab violet food coloring
2 1/2 cups flour
1 tsp salt
1 cup buttermilk
1 tsp vanilla extract
1 1/2 tsp baking soda
1 Tbsp white vinegar

Preheat oven to 350F.  Grease 2 round 8" or 9" cake pans, cut parchment paper to fit, and then grease parchment (I always use Baker's Joy and get great results.)
Using a mixer on medium-high speed, cream butter and sugar until fluffy.  Add eggs one at a time and mix well after each.  Mix cocoa powder and food coloring in a small bowl and add to the sugar mixture.
In a separate bowl, mix flour and salt together.  Add flour mixture and buttermilk to the sugar mixture, alternately.  Mix in vanilla.  In another small bowl, mix baking soda and vinegar. Add to cake batter.
Divide batter between the prepared pans and bake for 20-30 minutes.  Remove from oven when a cake tester comes out clean. Cool in pans 15 minutes, then remove to wire racks to cool completely.

Classic White Cake (recipe from Better Homes and Gardens)
4 egg whites
2 cups flour
1 tsp baking powder
Crumb coating
1/2 tsp baking soda
1/2 tsp salt
1/2 cup white shortening
1 3/4 cups sugar (I used 1 cup of Splenda for baking)
1 tsp vanilla extract
1 1/3 cups buttermilk (or soured milk-add vinegar to sour the milk)

It's worth noting here, and I only just realized this, that I only used ONE cup of sour milk because I was reading the WRONG recipe.  *smacking head on the keyboard*

Preheat oven to 350F.  Grease 2 round 8" or 9" cake pans, cut parchment paper to fit, and then grease parchment.  Sift together dry ingredients in a medium bowl and set aside.  Beat shortening with an electric mixer on medium to high speed for about 30 seconds.  Add in sugar and vanilla and beat until creamy.  Add egg whites, one at a time, and beat well after each addition.  
Add four and milk to butter mixture, alternately, beating on low speed until just combined after each addition.  Divide batter into prepared pans.  Bake 20-25 minutes, or until a cake tester comes out clean.  Cool in pans 10 minutes, then remove to wire racks to cool completely.

Freshly frosted
Buttercream Frosting (recipe adapted from Better Homes and Gardens)
I needed 1 1/2 of this recipe to frost this cake, this is a single recipe

1 cup shortening
1 1/2 tsp vanilla
1 lb powdered sugar (about 4 cups-although, I actually weighed it this time)
4-5 Tbsp milk

WIth an electric mixer on medium speed, beat shortening and vanilla for 30 seconds.  Add about half of the powdered sugar and beat well.  Beat in 2 tablespoons of milk.  Add in remaining powdered sugar and beat well.  Add in as much of the remaining milk to reach the desired consistency (I ended up using 5)

Assembling the Cake


Wash and pat dry 1 pint of similar sized strawberries, along with one large strawberry.  Berries should be ripe and firm, not mushy at all.  Set aside.

Place two wide strips of wax paper on your cake stand or cake taker. Removing these later will give the bottom of the cake a very clean finish.  I chose to layer the cakes white, blue, white blue.  On each layer,
spread a generous amount of frosting and place next layer.  When all layers are in place, frost entire cake with a thin crumb coating.  Allow cake to set for about ten minutes and then continue frosting the cake with the rest of the frosting.  There should be enough for a nice thick layer.

Once the cake is frosted, gently remove the wax paper strips from beneath the cake.  You should have a nice clean finish.  Now it's time to add the strawberries.  Hull and slice the similar sized berries in half and arrange all along the bottom edge of the cake.  Take the large strawberry and using either a knife or an egg slicer, slice it almost down to the hull, fan out the slices and place it on top of the cake.  And you're done!


I hope you all have a fabulous July 4th weekend, wherever you are.  And take a moment to appreciate that, despite not being perfect, America is still a pretty great place to be!

Thursday, June 16, 2011

Homemade Strawberry Jam


So, I got all my canning supplies, finally found the time and bought myself a big load of strawberries.  Bright red, juicy ones, too.  And very sweet!

I have a great canning book that my mom gave to me at some point and she had it for as long as I can remember.  It's called "In a Pickle or a Jam" and it has 157 pages of recipes for making jams, pickles, dressings, chutneys and anything else you can think of to can.  So I looked there for my first strawberry jam recipe.

But first, I had to get my supplies ready.  I bought half pint jars for making jam.  So I needed to sterilize the jars and the lids.  I also bought some quart size jars because I want to make some pickles.  My husband LOVES pickles, especially the homemade variety, so I think he'll appreciate it.  He is out of town at the moment, so I'd like to get some started so they are ready by the time he gets home, or at least shortly thereafter.

I boiled the jars in my hot water bath pan that I bought and boiled the lids separately, and then got the jam started.

Simple Strawberry Jam
(From "In a Pickle or a Jam," without added pectin)

8 cups (2 quarts) firm and ripe strawberries (the sweeter, the better!)
3 1/2 cups sugar
juice of 2 lemons

Wash, hull and pat dry strawberries.  Combine strawberries and sugar and heat very slowly until sugar dissolves (this could take a while, for this batch it took about 10 minutes.) Once the sugar has all dissolved, add lemon juice.  Since strawberries are low in pectin, the lemon juice in this recipe adds the pectin that is needed in order for the jam to thicken and set.

After adding the lemon juice, increase the heat to bring the mixture to a boil.  Then, use a masher to, well, mash the strawberries.  The more you mash, the less chunky the jam will be.  So, if you like chunky strawberry jam, mash a little.  If you like it more even and spreadable, mash a lot.

Now, the recipe I have said it would take about 12 minutes to boil the strawberries until the jam was set.  In actuality, it took more like 30 minutes.  This book is from 1971.  Maybe 1970's strawberries had more natural pectin?  I guess we'll never know.  So, continue boiling until the jam is set. How do you test?  Like this:


To start with, use a candy thermometer.  The jam should be about 220F degrees when it is ready.  Once it reaches that point, you can take a small amount and put it on a small plate or in a small bowl and put it in the fridge for a minute. It should get right up when it's ready.

One thing to watch for during the boiling process: the foam that forms on the top.  Just skim it off and toss it out.  It's got so much air in it that if it goes in the jar, when it deflates, it will affect the headroom that is left.

Once your jam has been boiling for a while and has reached the right temperature and is ready to set, it's time to put it in the jars that are prepared and waiting.

I got a great, inexpensive set of beginner canning supplies on Amazon and it included the wide mouth funnel, a jar lifter, a lid lifter and a few other essential tools.  

You'll want to get your jars out of the hot water, where they have been sitting and keeping warm and lay them out to fill.  using the wide mouth funnel and a ladle (best if that is sterilized as well,) fill the jars one by one.  Leave about 1/4 inch of head space on each jar.  That is 1/4 inch measured from the very top of the jar.  This recipe said that it would make 6 8-ounce jars.  In actuality, it made 5 full half pint (8 oz) jars.  So maybe my 8 cups weren't packed full enough.  Who knows?

Then, wipe down the outside of the jars, add the lids and then the rims.  Then in they go to the hot water bath.  The water should cover the jars by about an inch and should be boiling.  The jars should boil for about 15 minutes to seal them.  Once you remove them from the water, as they start to cool, the lids will start to "pop" down.  You should hear a fairly audible pop.  If it's been a while and the lids don't pop, it's a good idea to place your jam in the refrigerator.

A little bit of canning trivia that I did not know.  The flat lids on the top that seal the jars?  Those are NOT reusable.  Once they have sealed once, they will not seal again.  So, reuse the jars and the rims, but make sure to buy new lids!

Another funny little thing.  My canning book is so old, apparently, that there are no directions for canning with a water bath or a pressure cooker.  The only method discussed is using paraffin wax to seal the jars.  I distinctly remember my grandmother making jams and sealing them with paraffin. I'm not sure anyone still does that?

So that's it.  A simple strawberry jam.  So easy, someone who has never canned (um, me) was able to do it and get great results.  It came out great, thickened up well and tastes WONDERFUL!  My 4 year old helper agreed.  And we decided to give a jar to his preschool teacher as an end of the year thank you gift.  We hope she will enjoy it, too!

Sunday, May 22, 2011

My Grandma's Strawberry Rhubarb Pie

This was probably my favorite pie when I was younger.  As a matter of fact, it's still my favorite.  I love strawberries and I love how the rhubarb works with them.  It's just SO. GOOD.  I have memories of my wonderful Grandma Hazel making this pie, and this is her recipe.

Seriously, it's so yummy.

Even though making pie crust is my nemesis, I refuse to use a pre-made crust.  So despite my difficulties with crust, I just keep trying to find one that works for me.  I got this one from Salad in a Jar and it worked okay for me, although the top crust didn't come together quite as well as I would have liked.  Still, it worked well enough.  I might give it another try.

Simple Pie Crust
3 cups all purpose flour
1 cup shortening
6-9 Tbsp ice water
pinch of salt

Use a pastry cutter or a food processor to cut the flour and the shortening (two butter knives will work if you don't have either of those)  I used my food processor and pulsed it a few times until the shortening was reduced to the size of peas.


Sprinkle the ice water over the mixture and begin to press in to a ball.  Only use as much water as necessary to avoid ending up with a too moist ball of dough.  Once you have a nice ball of dough, it's time to roll it out. I tried this method because it was one I hadn't used before.  Take a plain tea towel and sprinkle with flour.  Dump the dough ball on to the floured surface and using the towel, press it into a tighter ball.  Use your floured rolling pin to roll the ball dough outward from the center. When the dough is large enough and thin enough, place the pie plate over the dough, slide your hand under the tea towel and flip the whole thing upside down.  Then it is ready to fill!

Ideally, this would be a whole lot smoother looking, but as I said, I am pie crust challenged

Strawberry-Rhubarb Pie Filling
2 cups cut up strawberries
2 cups cut up rhubarb
2 eggs, beaten well
1 1/2 cups sugar (I used 3/4 Splenda baking blend)
3 1/2 tsp flour
1/2 tsp nutmeg

Beat the eggs.  Add sugar, nutmeg and flour together and beat into eggs.  Pour over cut up fruit and mix well.  

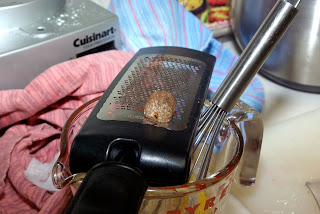
Freshly grated nutmeg-SO much better than the pre-grated stuff!

Pour entire fruit mixture into prepared pie crust


Cover with top crust.  Now, here's where mine goes a little awry, since my crust came out less than perfect. I ended up taking large sections on pie dough and just placing them over the filling, while forming the edge.  It actually ended up looking quite nice.  But, ideally, you'd place an entire second crust on top and then crimp the two together at the edges.

Not perfect, but workable
Place pie into a oven preheated to 400F and bake for 15 minutes.  Reduce the heat to 350F and bake an additional 35-40 minuted, until crust is browned.


Like I said, I love this pie.  It is sweet and just a little bit tart.  And this crust turned out to be nice and flaky.  And now I'm craving this pie again, so I might have to make it again soon!