Monday, August 20, 2012

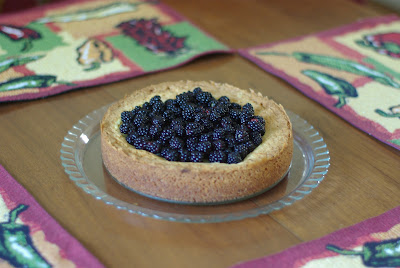
Blackberry Custard Torte


I've recently returned from my annual summer vacation in Maine. I love Maine. And I love that the blackberries are always ripe when I visit in August. This year, my mom had a brand new kitchen for me to bake in (she had a kitchen remodel done just a month after my visit LAST August) and a family friend invited me over to his house to pick wild blackberries. My five year old and I headed over and I picked enough (I say I, because he decided after picking about 3 berries that he was done and then found a spot in the shade) to fill a large berry basket.

Mom's request was this particular recipe, a blackberry torte which she told me she had made once, years ago. After a bit of hunting, we found the particular recipe she was after and my helper and I went to work.

First of all, I love cooking in Mom's kitchen, because she has all kinds of cool vintage kitchenware. Secondly, after years of baking in her very dark kitchen (it is a U-shaped kitchen with a single window) with walnut colored cabinets, it was like a dream to bake in her newly done space. Not just the color was changed, but the whole configuration of cabinets, making a much more efficient workspace. I had been looking forward to it all year! (Yes, strange things excite me)

So, let's get down to the recipe...

It is from the June/July 2000 issue of Taste of Home, and can be found online here.

Ingredients:
Dough will be very pasty and sticky
Crust:
1 cup all purpose flour
1/2 cup sugar
1 1/2 tsp baking powder
1/2 cup cold butter (1 stick)
1 egg

Custard Filling:
3 egg yolks
16 oz sour cream
1/2 sugar
1/4 tsp vanilla extract
4 cups fresh or frozen blackberries, divided
whipped cream


Combine flour, sugar and baking soda. Cut in the butter with a pastry blender until crumbly. Add in the egg, stirring with a fork, until the dough forms a ball. It will be very sticky.  In an ungreased springform pan, press the dough on the bottom and up the sides, being careful not to leave any gaps. I found using a silicone spatula, slightly greased to keep the dough from sticking to it, worked really well.


In another bowl, combine the egg yolks, sour cream, sugar and vanilla, mixing until just combined. Spread half of the blackberries over the crust dough, then pour the filling over the top, spreading until smooth. Bake at 325F for 90 minutes. Center will be almost set and will fall after cooling. Once cool, add the remaining blackberries to the center of the torte.

To serve, remove the outside of the springform pan. Slice and add a dollop of whipped cream. Serves 14-16. Enjoy!


Friday, July 27, 2012

Apple-Cheddar Quiche


I've always resisted the apple-cheese combination. I know a lot of people like it. I've seen slices of apple pie with a big slice of melted cheese on top. But it always turned me off. The thought of pairing cheese with apples just didn't do it for me. 

Then one day a few weeks ago, I was making lunch for my son and was cutting up slices of apple and cheese. For no good reason, I took a piece of each and ate them together. And it was good!

So when I was looking for something for brunch last week, I stumbled on this unusual quiche and decided to give it a try. I'm glad I did, because I think it was fantastic. It was a little change from the typical quiche and the apples and cheddar balanced each other nicely. I highly recommend it if you are looking for something a little different.

Ingredients:
1 unbaked pie crust (I used a frozen pre-made crust that was in my freezer)
2-3 tart, firm apples (such as granny smith) peeled, cored and sliced
1 cup shredded cheddar cheese
2 eggs, beaten
1 cup evaporated milk
1/2 tsp salt
dash each of cinnamon and nutmeg

Preheat oven to 350. Fit the pie crust into a 9 inch quiche pan or pie plate. Arrange the apple slices in the pie shell. My quiche pan fit 2 good sized granny smith apples. Sprinkle the cheese evenly over the apples. In a small bowl, combine the eggs, milk and spices. Pour the mixture evenly over the apples and cheese. Bake for 60-70 minutes. Serve warm or chilled.

Recipe adapted from Yankee Magazine

I made this the night before brunch and served it at room temperature the next day. It was great that way. I also warmed up a piece for dinner later that night and it was great warm as well. Enjoy!

Tuesday, July 24, 2012

Baked Donut Holes


Baked donuts. Easier and far healthier than fried donuts. And who can resist a cute donut hole?  

Not kids, that's for sure. Because I made this batch of 24 donut holes and by the end of my brunch last week there were 4 left. Those 6 toddlers and preschoolers went to town on the donut holes. But that's okay. I can easily make more because these were SO quick and easy to make. You can find the original recipe here, although I altered it a bit.

Ingredients:
1/2 cup sugar
1/4 cup melted butter or margarine
1/2 cup milk
1 tsp baking powder
1 cup flour

Preheat over to 375 and grease a mini muffin pan (mine has 24 spaces, so I only needed to do this once.) Mix sugar and melted butter or margarine in a medium bowl. Stir in the milk, and then the baking powder and flour until ingredients are just combined.  Fill muffin cups halfway. Bake 15-20 minutes. Tops should be a light golden color.

Meanwhile, melt another 1/4 cup of butter or margarine in a large dish and add about 3/4 cup of powdered sugar to a large Ziploc bag. Once the donuts come out of the oven, cool slightly. Then roll in the melted butter and place in the sugar. Shake well to coat and then set aside to cool.

I might make these again next time I have to bring something to a playdate. They were quick, easy and yummy. Tasted just like a donut hole! Enjoy!